


9-16-2024: The HVAC&R Weekly Edition: Issue #15
Like any Pool Shark will tell you, it’s all won or lost on the break! So let’s brew up a bit of Tee, I’ll pour the Earl Grey, an explain it to you.

Last week I left you with some homework, it was to take a 4” offset on 5” I.P. and to find the angle of the offset, the take-off of the fitting, and the advance of that offset.
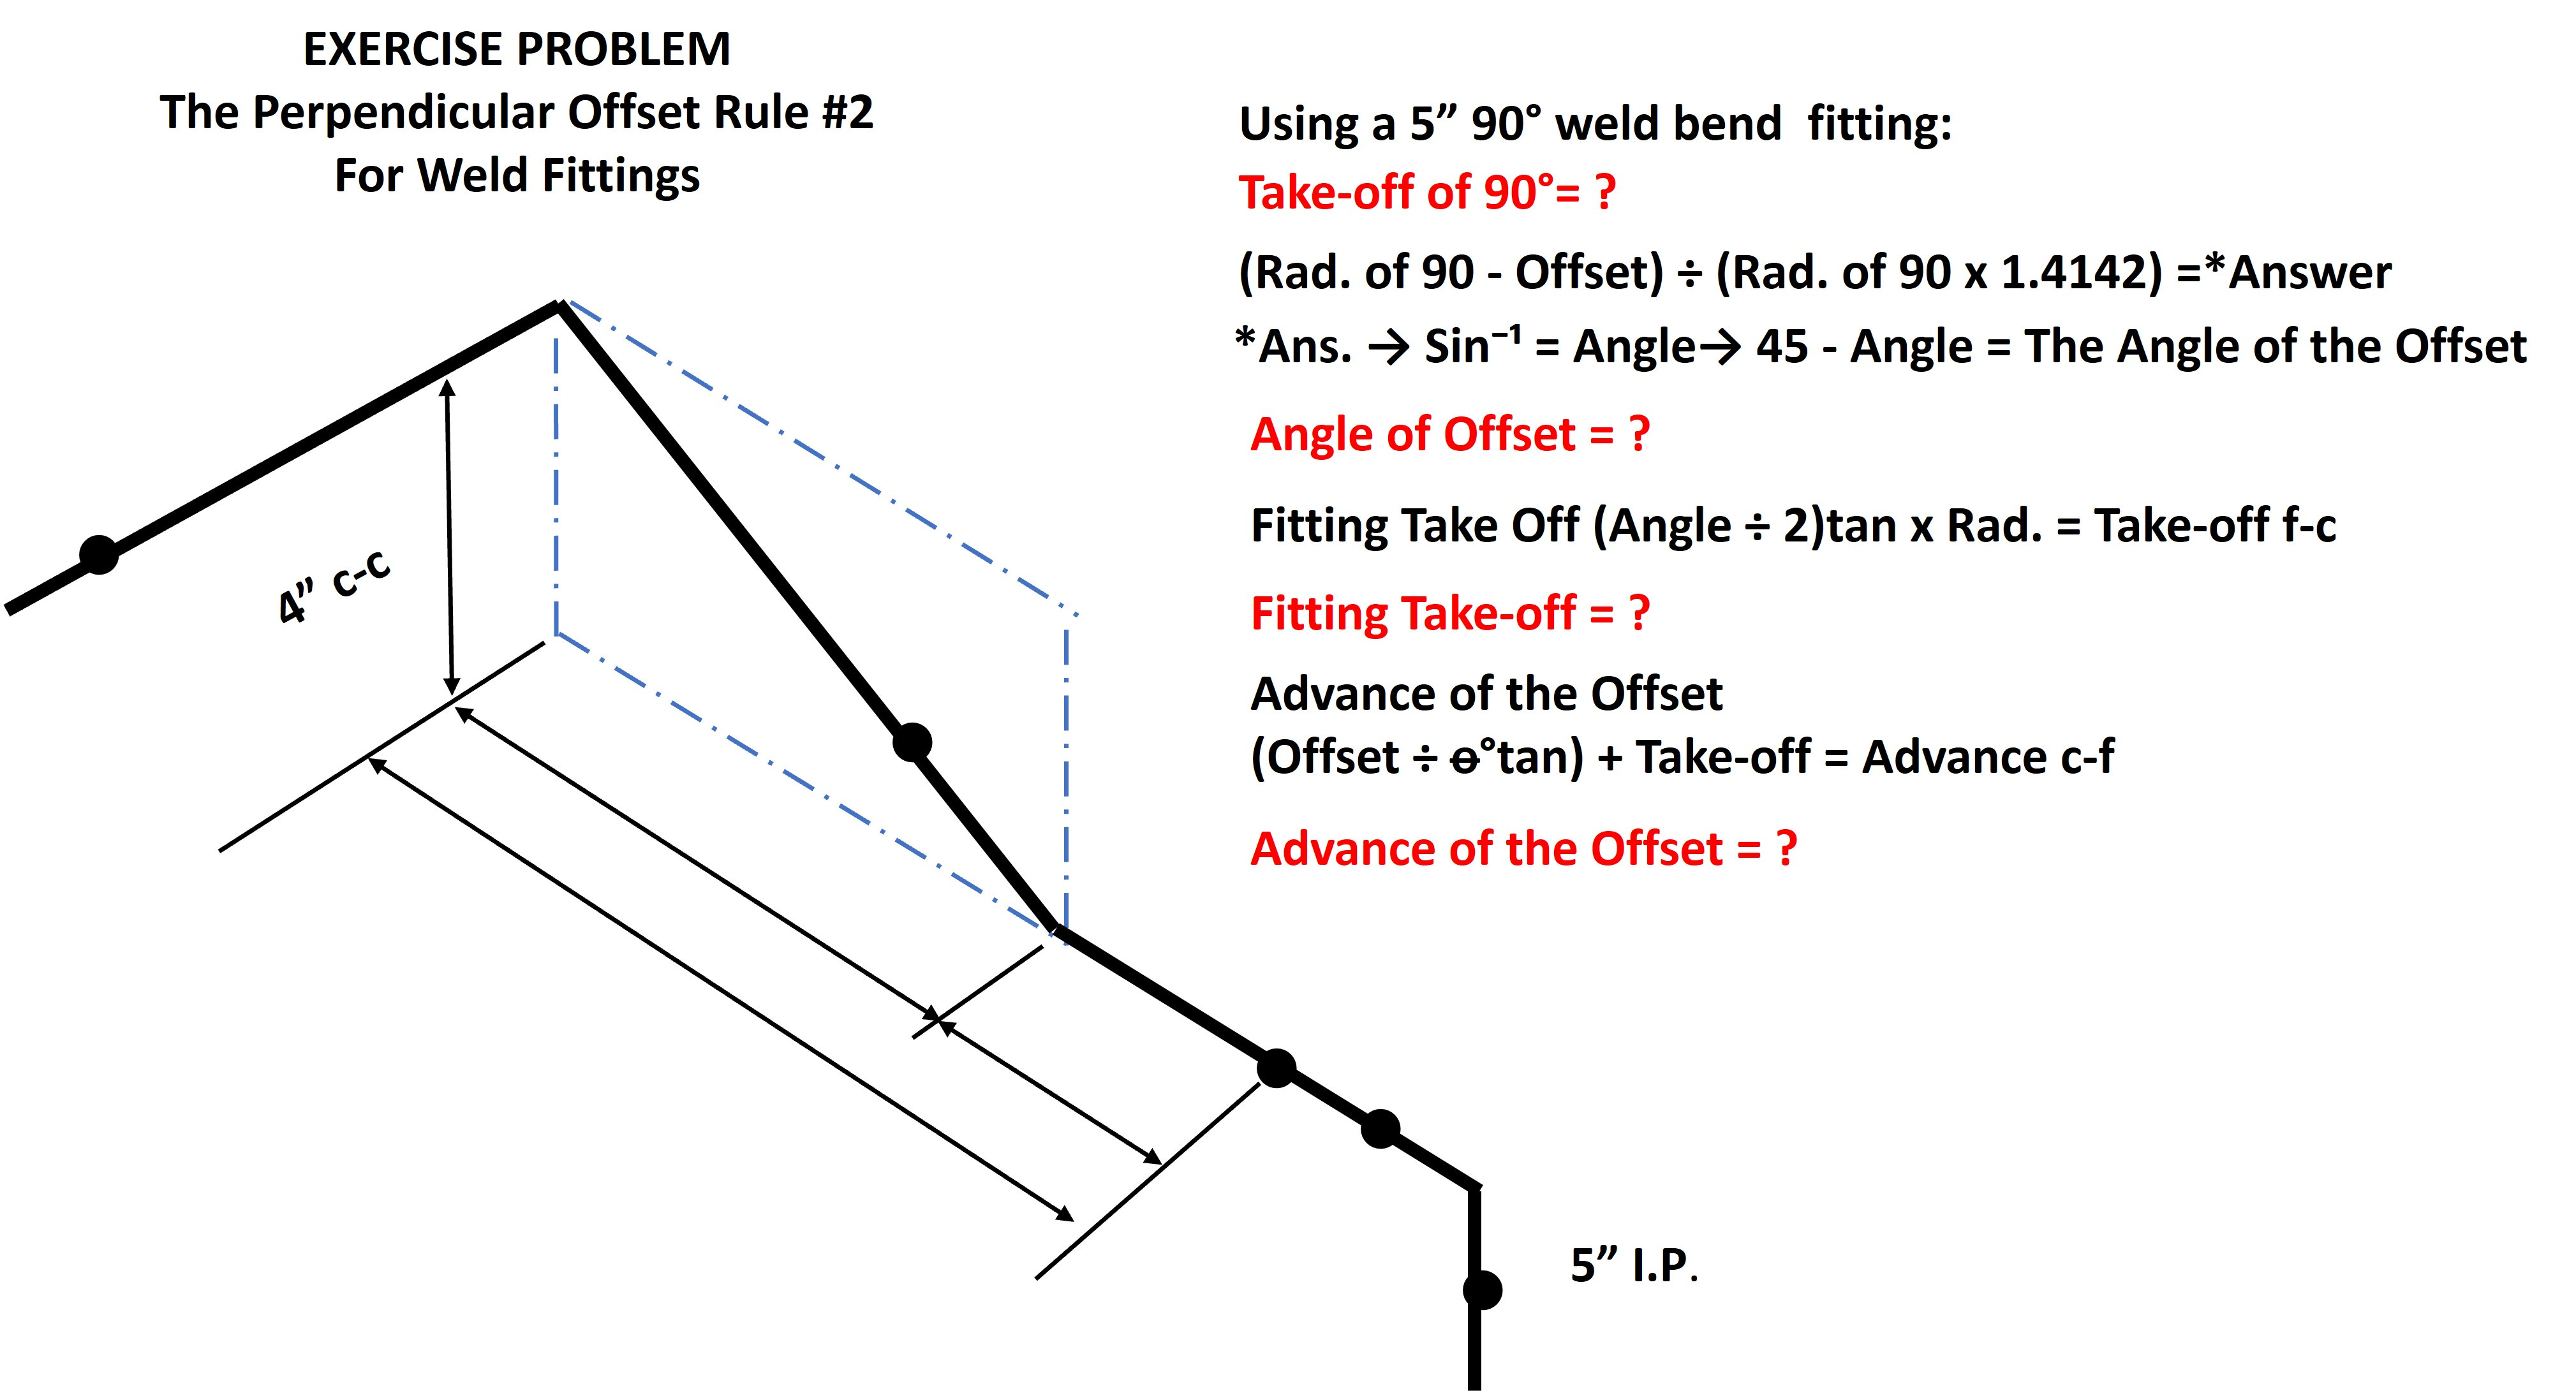
EXERCISE PROBLEM 4” OFFSET ON 5” I.P.
Here’s what that solution should look like. No, you didn’t have to draw it as nicely as I have but a rough sketch does help keep the components straight.
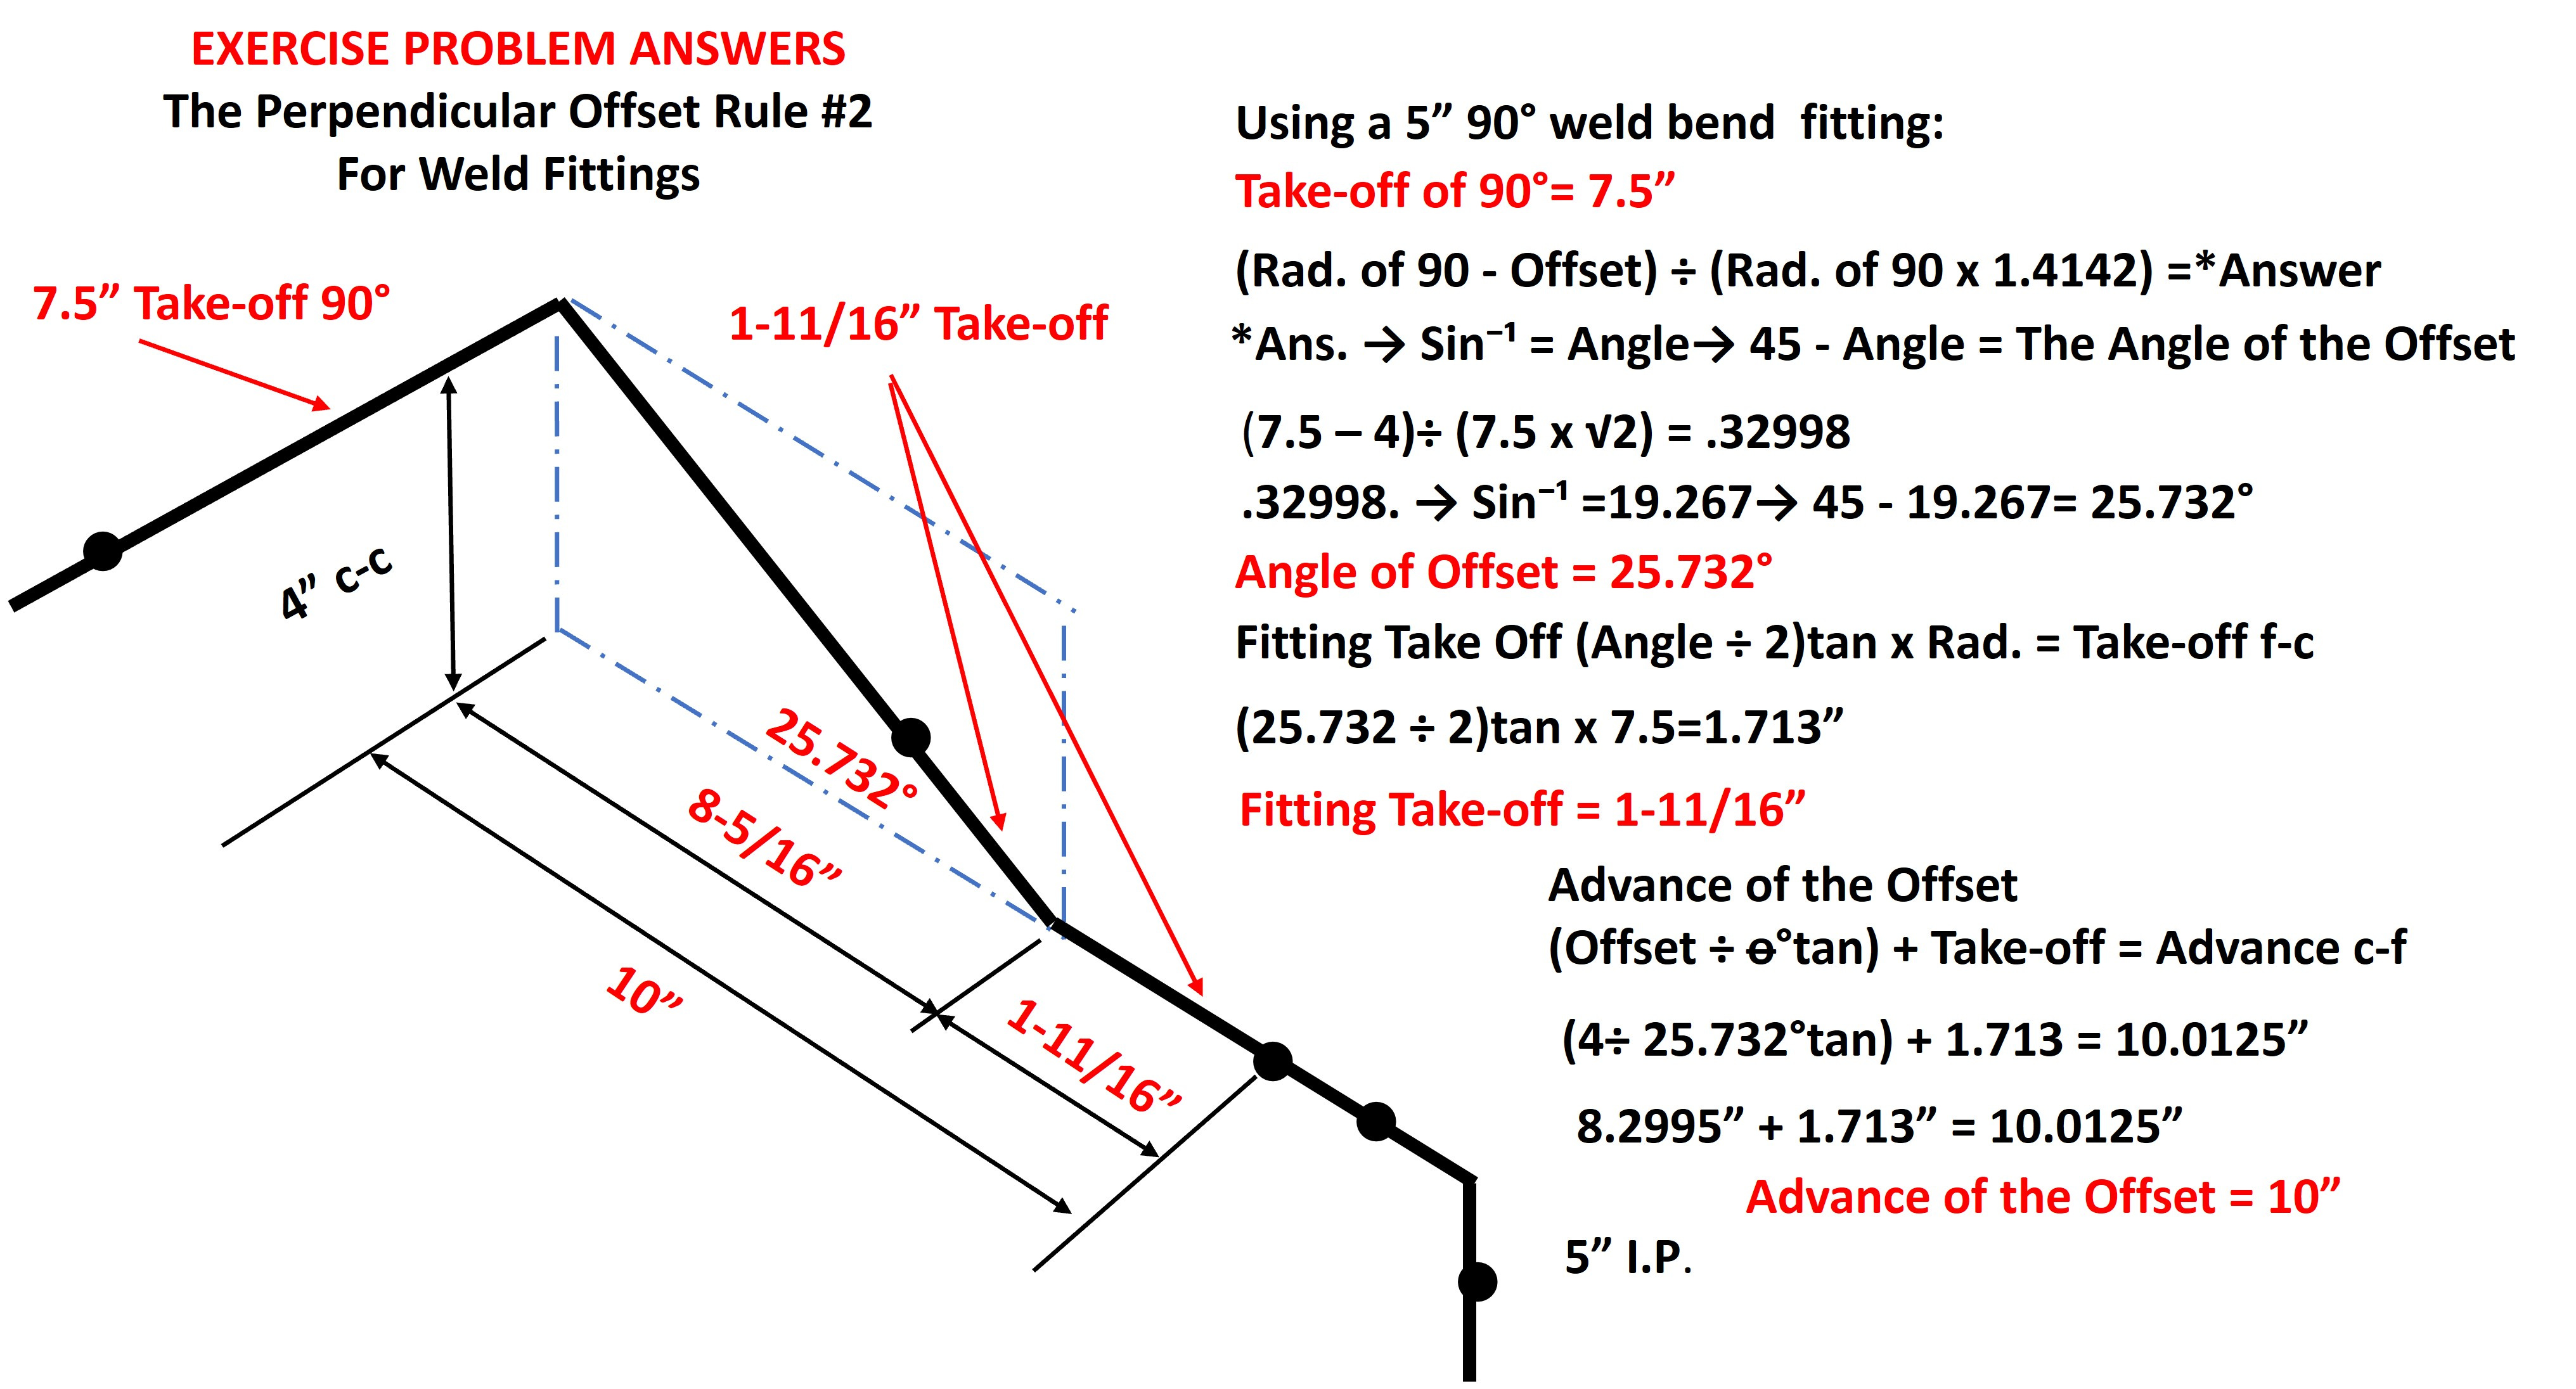
EXERCISE PROBLEM 4” OFFSET ON 5” I.P. ANSWERS
Here is the solution for the given problem from last week.
Take-off of 90° weld bend = 5” x 1.5 = 7.5”
Angle of offset= (7.5 - 4)÷ (7.5 x √2) =.32998→ Sin⁻¹= 19.267°→ 45° - 19.267° = 25.732°
Angle of the Offset = 25.732° or 25°43’ 56”
Take-off of fitting = (25.732°÷ 2)tan x 7.5 = 1.713”
Take-off of the fitting= 1-11/16” c-f
Advance of offset = (4÷ 25.732° tan) = 8-5/16” + 1-11/16” = 10”
Advance of the Offset Center to Face =10” c-f
Use data to layout mitered fitting.
It is important to remember that a perpendicular offset can “break” in one of two ways, one with the 90° fitting, the travel, the advance of the offset, and the mitered fitting all in the perpendicular plane like in the above example.
Or it can “break” so the 90° is the only fitting in the perpendicular plane. Both configurations result in the same offset dimension but this second example minimizes the length of the break. Sometimes we need that shorter configuration to fit within the physical boundaries that we are working with. Here is an example of that alternate break.
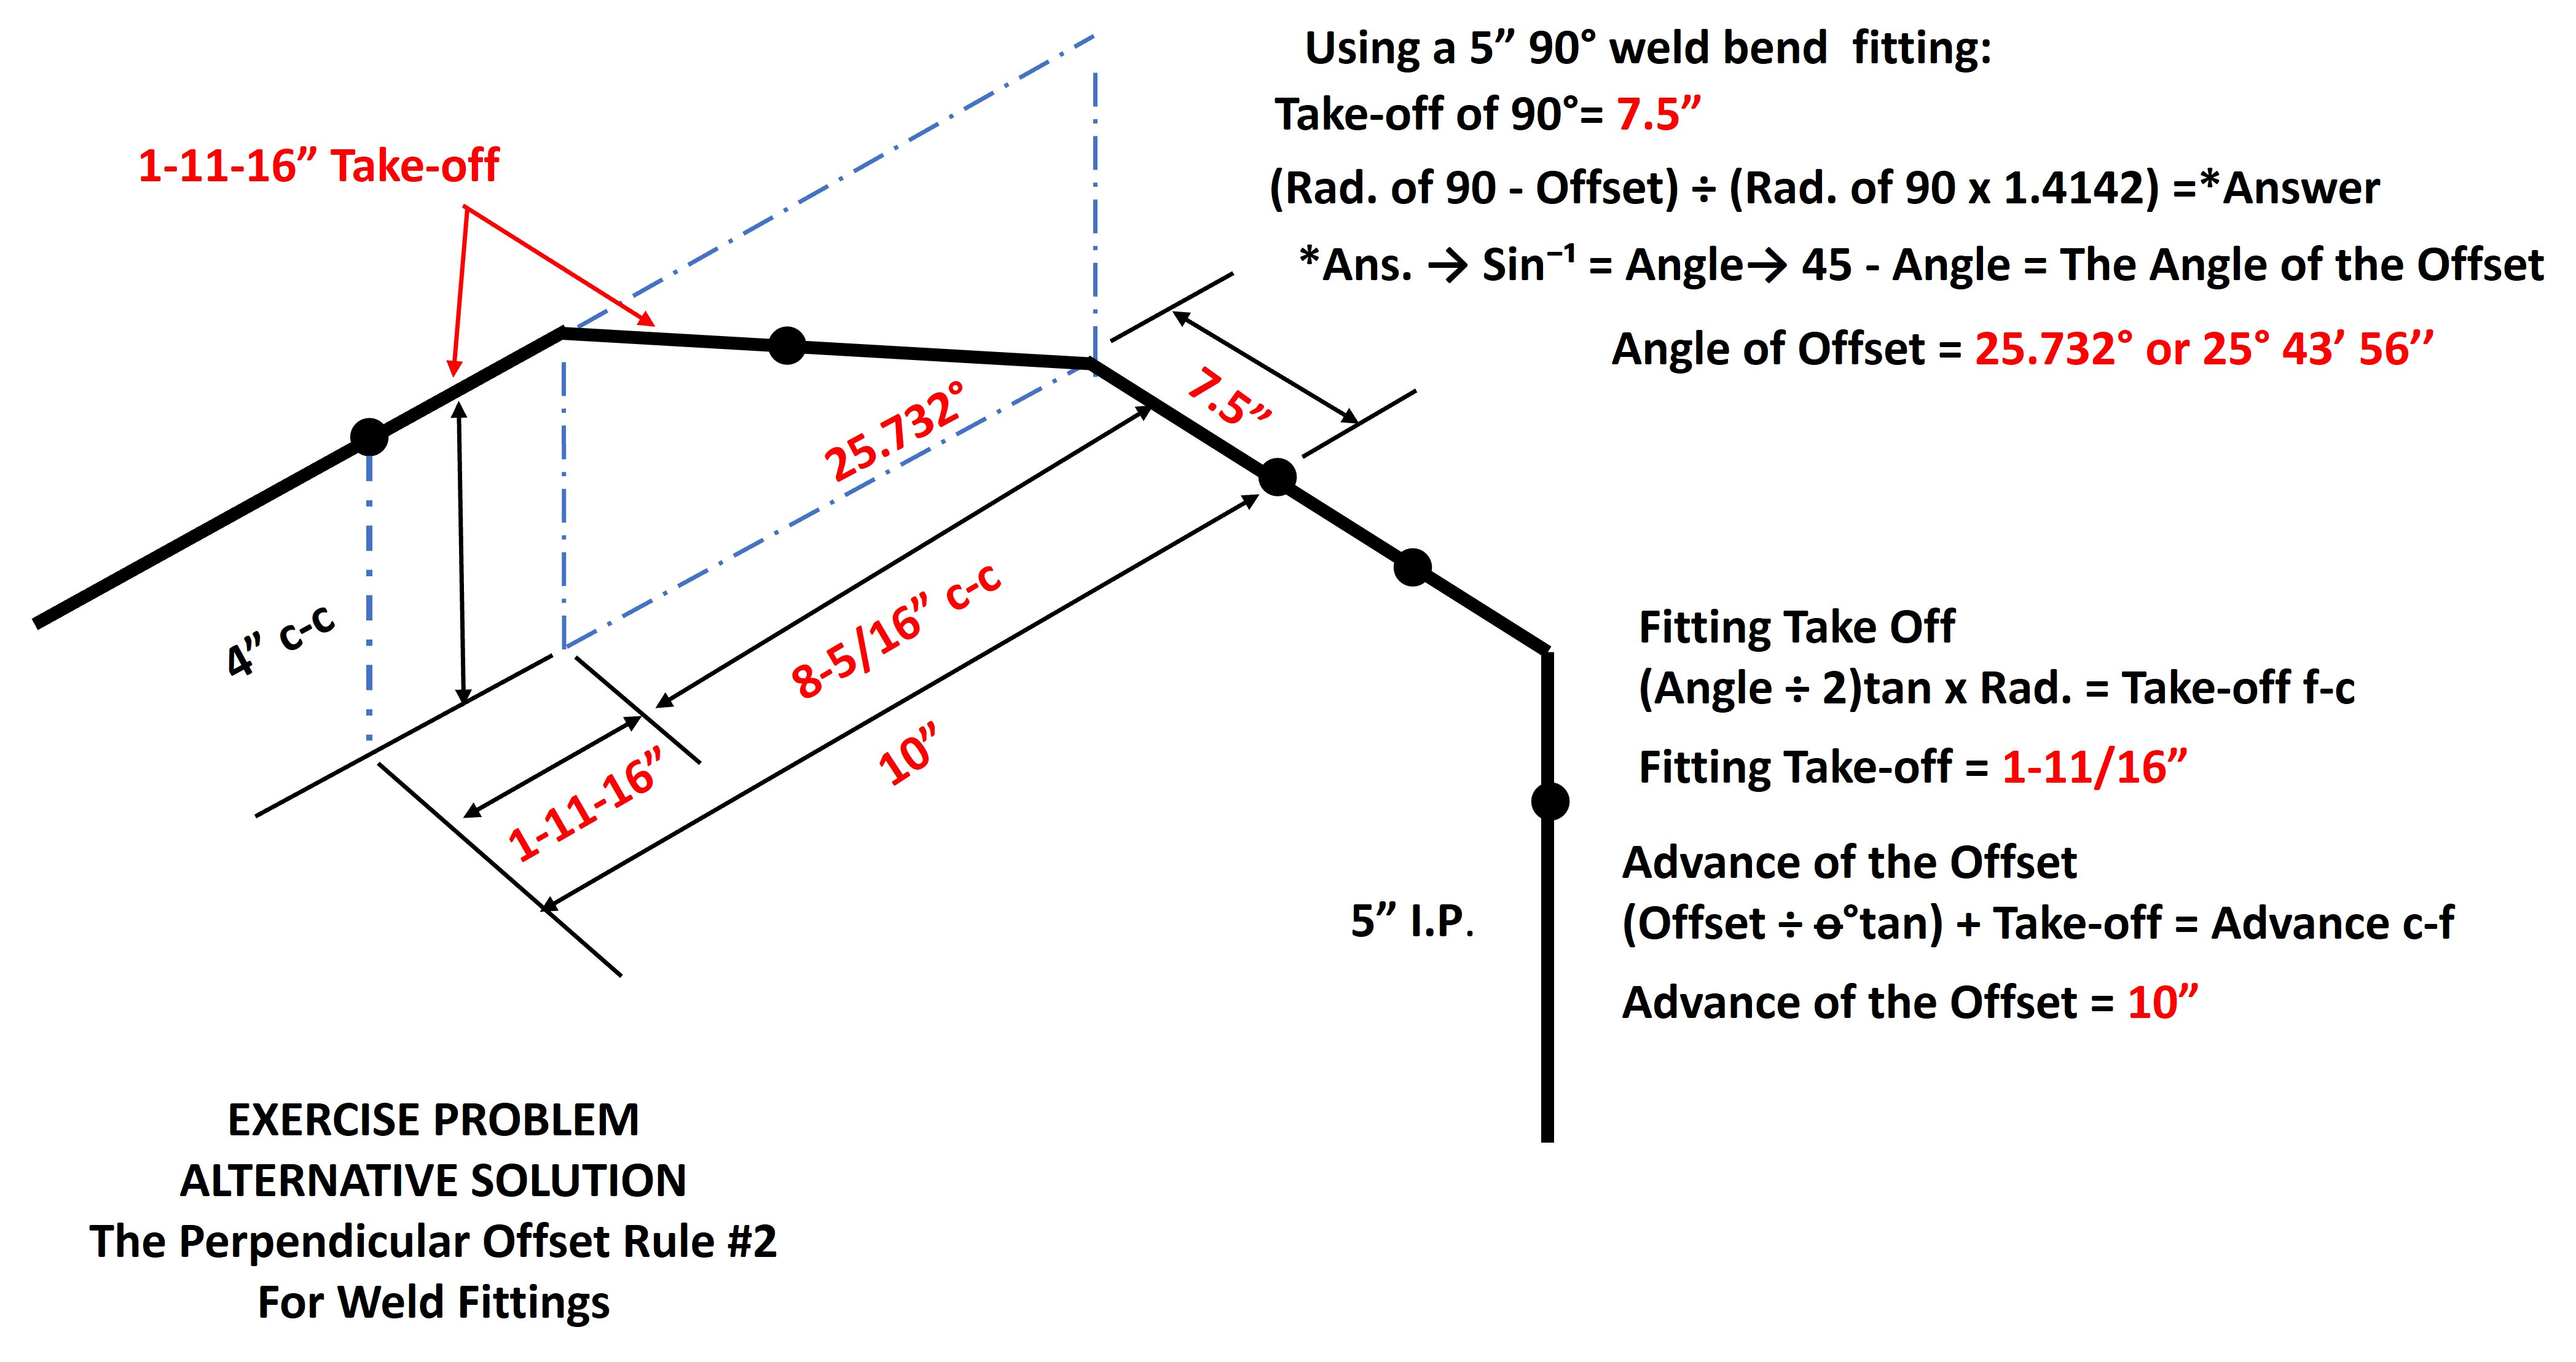
4” OFFSET ON 5” I.P. AN ALTERNATE SOLUTION WITH ANSWERS
As you can see we were able to reduce our perpendicular “break” from 10” face to center, down to 7.5” face to center. That configuration reduces the break by 2-1/2”. Sometimes getting a good “break” is the key to winning the match.
ANYBODY FOR A SPOT OF TEE?
Let’s use what we’ve learned regarding the last two Perpendicular Formulas and the 45° Perpendicular Offset Rule #1 and apply it to a Perpendicular Offset that uses a mitered fitting coming off a welded Tee header or a vertical riser. I developed this formula and method years ago after committing a tragic error. I assumed I could use the same exact formula as I did for a Perpendicular 90°Offset and apply it to a Tee. WRONG.
THE PERPENDICULAR TEE OFFSET
What makes a perpendicular offset using a weld tee unique is that a weld tee and a 90° weld bend do not share the same radius for the same given pipe size. And also the fact that weld Tees come in a variety of branch sizes with different take-offs. To adjust for that variance and those differences and so we can continue to use the radius of a 90° fitting (based on the branch size) to determine which offset formula to select, we have to develop both a new reference angle and find the Cosecant of that reference angle or angle factor. That new reference angle and angle factor will be different for each individual sized weld Tee, and branch size.
Essentially the “less than greater than rule” still applies, but now the new reference angle is our line in the sand. One additional obvious difference is the upper dimension limit is the sum of the take-offs for a 90°weld bend fitting and the selected weld Tee take-off. Follow along as we calculate and collect the data.
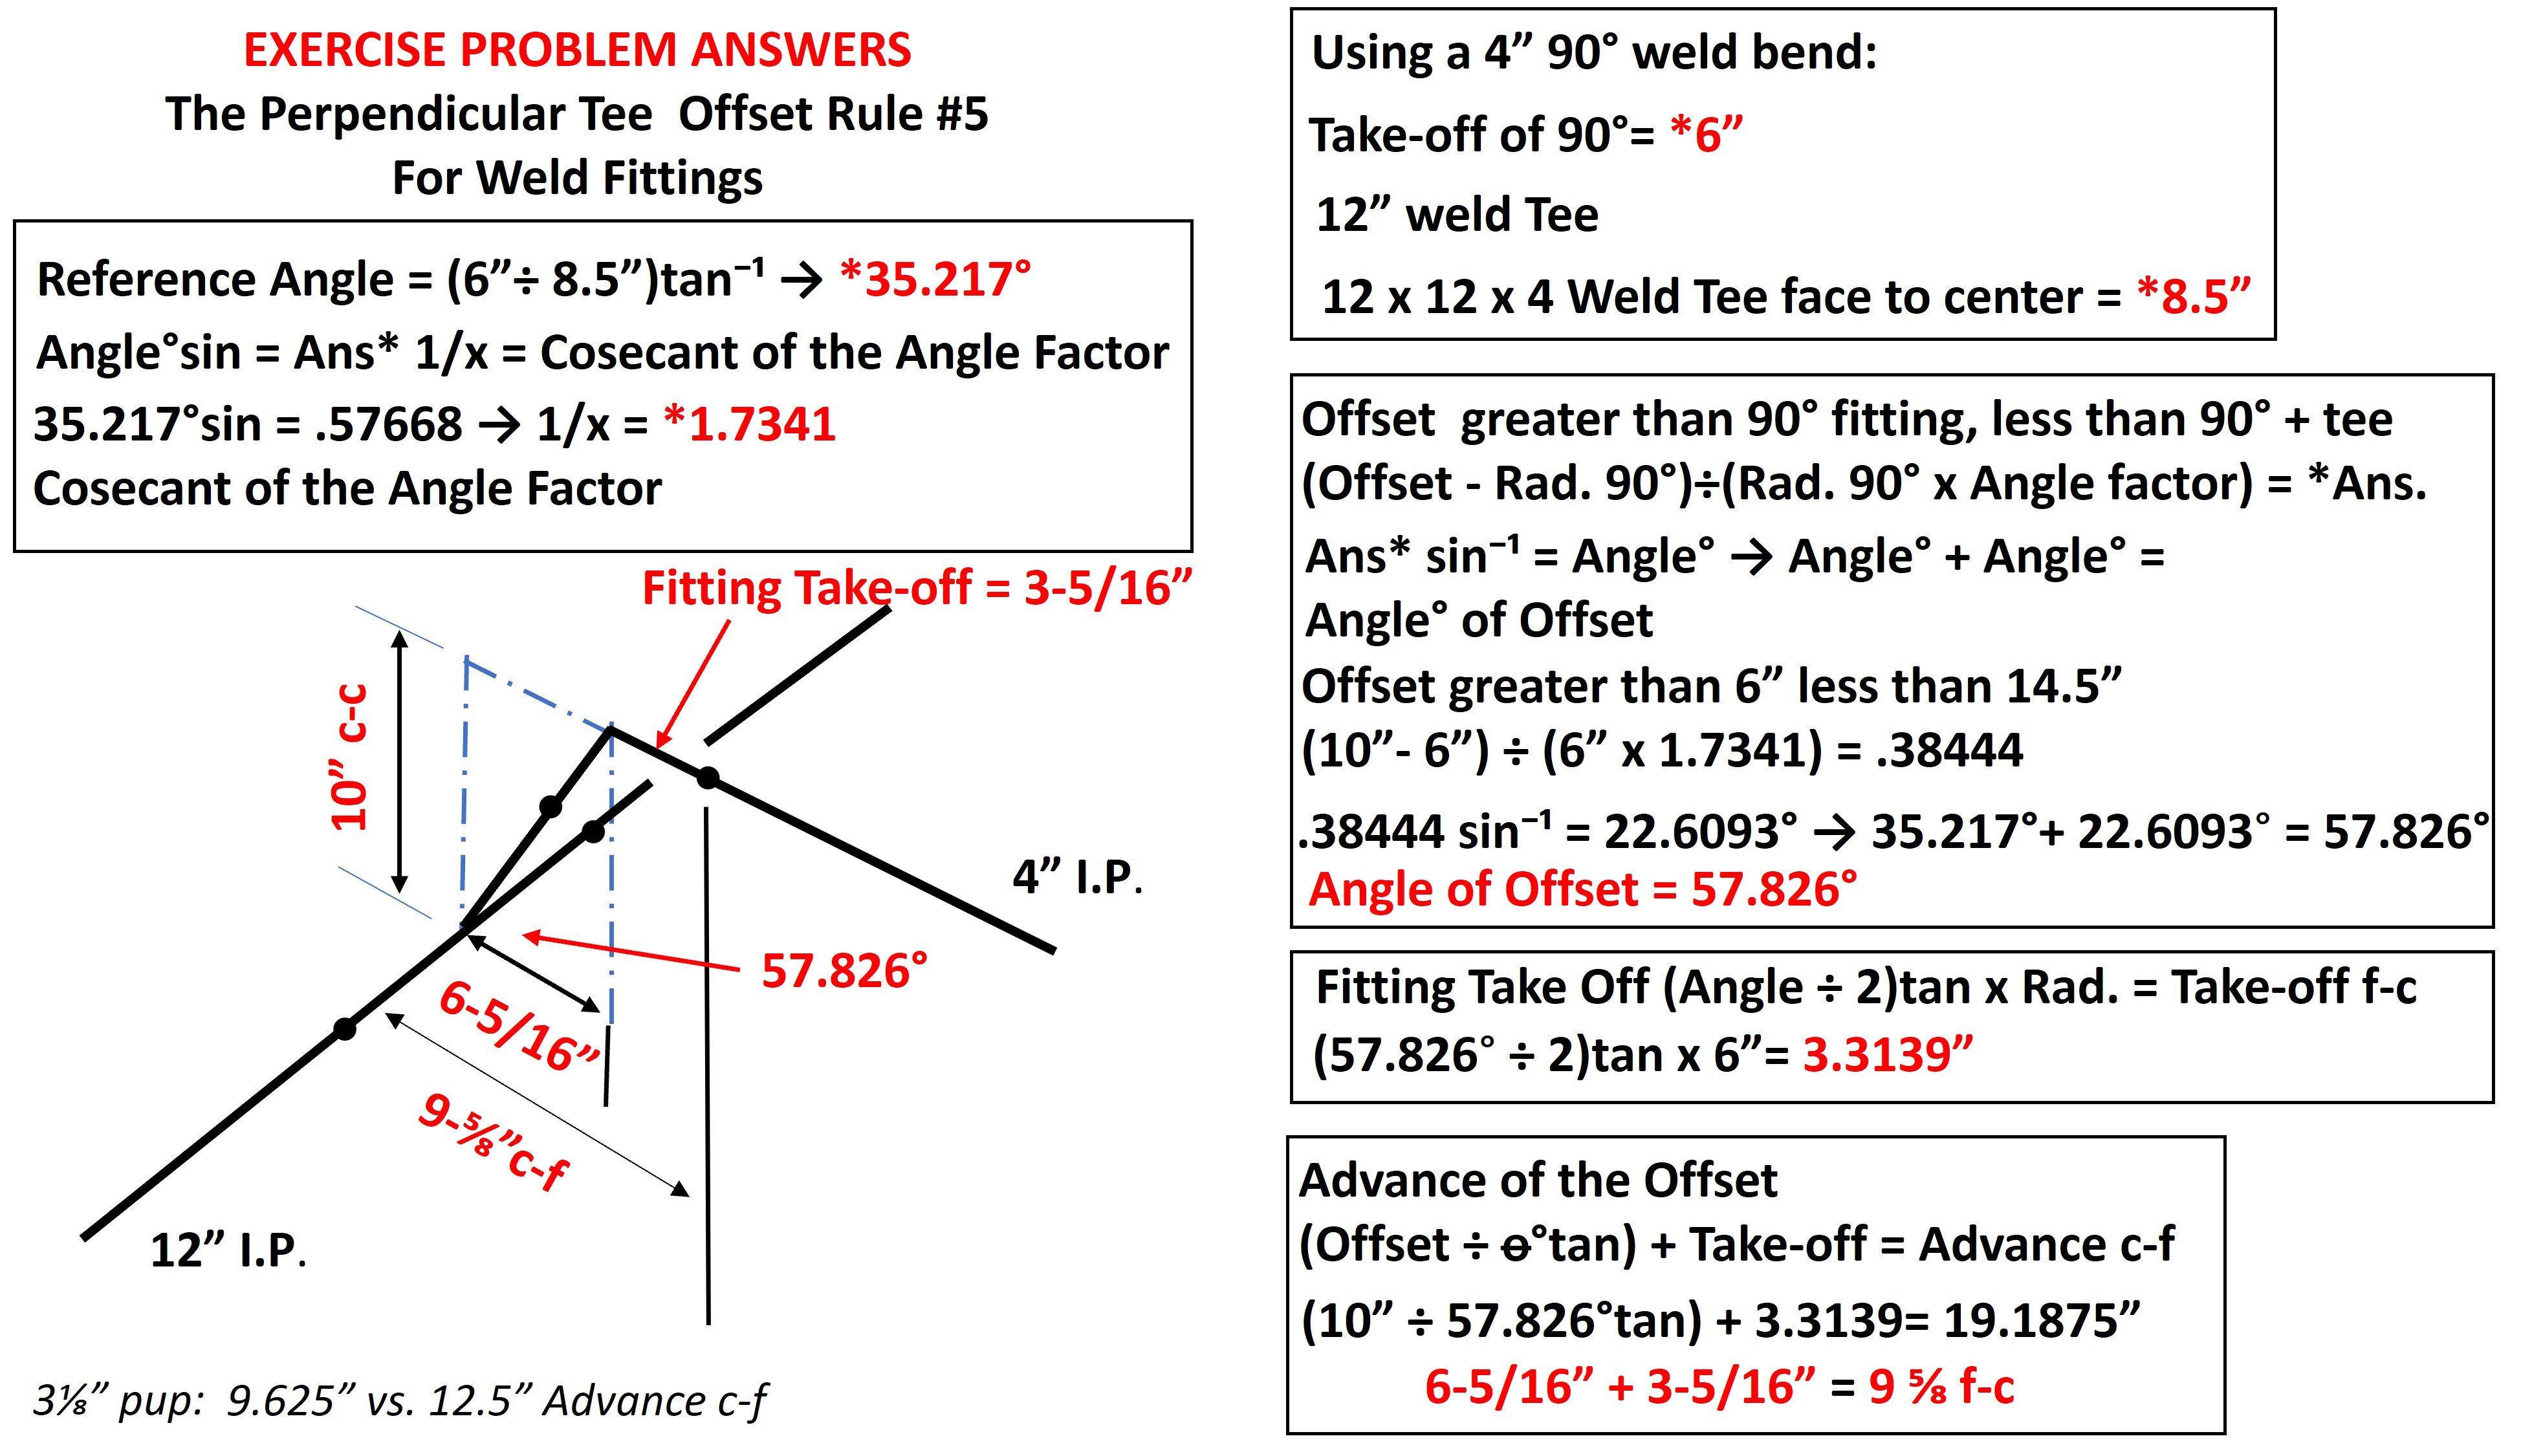
Calculating The Reference Angle (Example 4” Branch on a 12” Header with a 10” offset )
Reference Angle = (Rad. 90°÷ Tee f-c)tan⁻¹
Select a 12 x 12 x 4 weld Tee with a 4” I.P Branch connection for our example.
12 x 12 x 4 Weld Tee face to center = 8.5” (see weld bend catalog pg. 53)
4” Weld Bend 90° → 4” x 1.5 = 6” Radius
Reference Angle = (6”÷ 8.5”)tan⁻¹ → 35.217°
The less than dimension will be any offset less than 6” and will have an angle greater than 0° but less than 35.217°
The greater than dimension will be any offset greater than 6” but less than 14.5” will have an angle greater than 35.217°but less than a 90°.
Calculating The Angle Factor (Example)
Using the calculated reference angle (see above)
Angle°sin = Ans* 1/x = Cosecant of the Angle Factor
35.217°sin = .57668 → 1/x = 1.7341 Cosecant of the Angle Factor for our example
Perpendicular Tee Offset Formula #4 (Less Than)
Offset Angle less than = (Rad. 90° - Offset)÷(Rad. 90° x Angle factor) = *Ans.
Ans* sin⁻¹ = Angle° → Reference Angle° - Angle° = Angle of Offset
Perpendicular Tee Offset Formula #5 (Greater Than)
Offset Angle greater than = (Offset - Rad. 90°)÷(Rad. 90° x Angle factor) = *Ans.
Ans* sin⁻¹ = Angle° → Reference Angle° + Angle° = Angle° of Offset
We are going to use this formula to solve the 10” offset problem
12”x 12”x 4” Tee with a 4” Branch; Offsetting 10” c-c. This offset is greater than the take-off (radius) of a 4” 90°weld bend fitting (6”) but less than the sum of the 90 weld bend and weld Tee (8.5") 6 + 8.5 = 14.5”
Offset Angle greater than = (10”- 6”) ÷ (6” x 1.7341) = .38444
.38444 sin⁻¹ = 22.6093° → 35.217°+ 22.6093 = 57.826°
Let’s see what that looks like when we draw it up.
Example Perpendicular Tee Offset Formula #5 (Greater Than)
Example Perpendicular Tee Offset Formula #5 (Greater Than)
We selected the Perpendicular Offset Formula (Greater Than) because the 10” offset was Greater than the take-off of the 4” branch 90°weld bend fitting, but less than the 14.5” sum of the take-off of the 90°fitting (6”) plus the 12 x 12 x 4 weld tee (“8.5”) we were working with. So you can see a little data collection is needed before we jump right in crunching numbers. Critical to all of this is finding the reference angle and the angle factor. The additional calculations for the fitting take-off and the advance are required to verify the configuration will fit the application we need and that a proper fit up is achieved. All that is captured in the illustration above.
Once we know the angle of the offset we need to cut that down from either 45°weld bend fitting or a 90° weld bend fitting to complete the process. I will present cutting down a 45° weld bend in a later Issue.
MITERING OUR FITTING
Find the center line Radius (takeoff) for a 4” 90° weld bend 4 x 1.5 = 6”f₂c
Find the OSA→ (Outside Arc-Length) for a 57.826°mitered fitting from a 90° weld bend fitting. O.S.A. = 8.25 x .01745 x 57.826° = 8-5/16” O.S.A.
Find the ISA→ (Inside Arc-Length) for a 57.826°mitered fitting from a 90°weld bend fitting = I.S.A. = 3.75 x .01745 x 57.826° = 3-13/16” I.S.A.
Find the Rise dimension for the Quadrant Mark for a 57.826°→ 57.826°sin x 6 = 5-1/16” Rise dimension.
Find the Run dimension for the Quadrant Mark for a 57.826°→ 57.826°cos x 6 = 3- 3/16” Run dimension.
Time for you to take a shot at this.
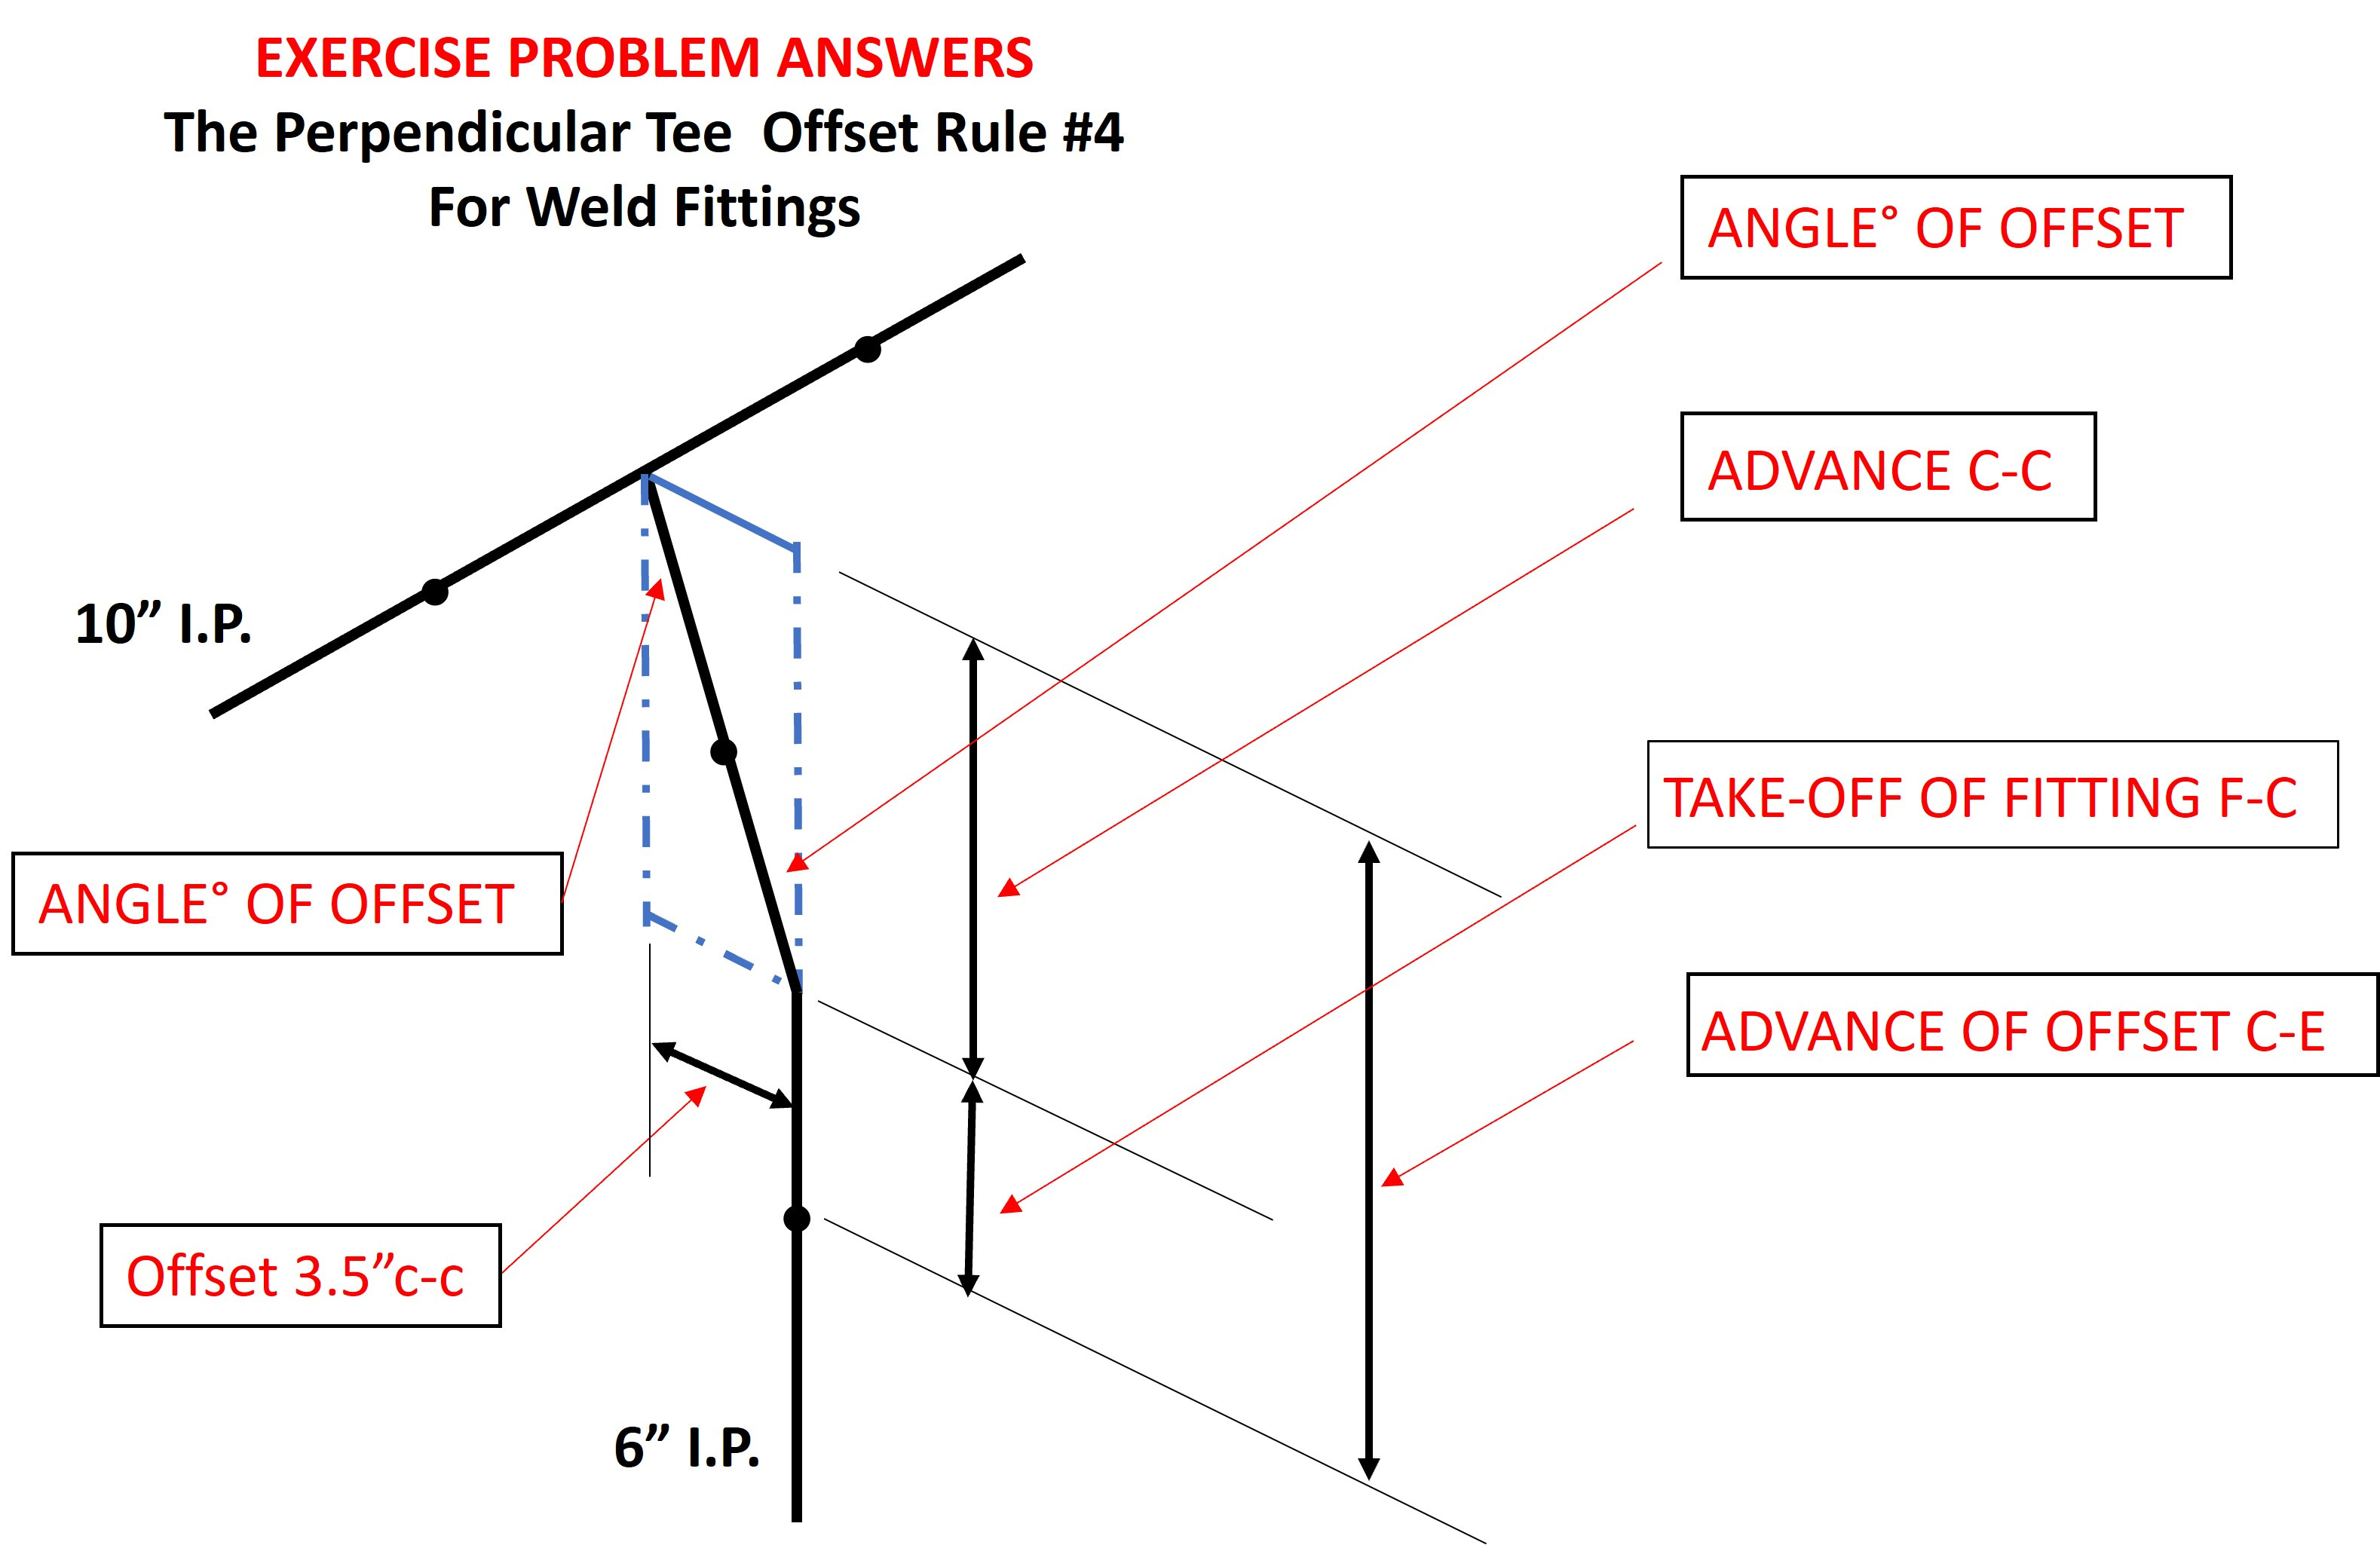
The Offset dimension is 3.5”c-c
The Perpendicular Tee offset that uses a 10” x 10” x 6” weld Tee. Use the weld bend catalog to find the face to center dimension at the branch.
This offset uses a 6” Branch connection
Find the Radius for a 6” 90° weld bend fitting (Nom. size x 1.5)
Find the Reference Angle and Angle Factor using the methods described above.
Select the correct Perpendicular Offset Tee Formula
Find the Angle of the offset and mitered fitting.
Find the Take-off of the mitered fitting Face to Center.
Find The Advance of the offset Center to Center
Find The Advance of the offset Center to End.
Find the OSA and ISA Arc lengths needed to miter the fitting
Find the Rise and Run dimensions to locate the two additional Quadrant Marks.
See drawing for details.
SHOW ME WHAT YOU GOT!
The reins are in your hands, lets see how you do. Next week we will review your answers, introduce one last Offset formula that should be in every pipefitters tool box and a technique to cut down a 45°weld bend fitting instead of a 90°.
I do appreciate your feed back so please leave a comment, or if you have any questions please feel free to reach out. If you know someone that may find this kind of information helpful please feel free to share.
Be safe and have a good week.